DIY Rattan Webbing Closet
Skill Level: Beginner
Here you can find a step-by-step guide and some useful tips to build up your own rattan closet from scratch.

This guide will create a closet 1m 30cm high, 40cm deep and 80cm wide.
Products You Will Need


Things You’ll Need
- Wooden boards, Beams, Slats and Dowels
- Thin MDF Plate 4m of Rattan webbing (40 cm wide)
- Wood Stains
- Wood Glue
- Clamps
- 1x Pen/Pencil
- 1x Measuring Tape
- 1x Safety Gloves/Masks/Glasses or Goggles
Step by Step Instructions
Step 1.
For the closet you'll need:
- 4 wooden boards 80 on 40cm (we are going to cut the corners)
- 4 wooden beams 130cm long (square: 4.7cm on 4.7, adjust to your beams)
- 1 wooden beam 80 – 4.7 – 4.7 = 70.6cm (this will be the bottom horizontal beam)
- 10 wooden board 40 – 4.7 – 4.7 = 30.6cm (the side boards where the wooden shelves will lean on)
For the doors:
- 4 wooden slats 97.5cm long (you can choose how wide, we used are 3.5 cm)
- 8 wooden slats 40 – 3.5 – 3.5 = 33cm long
For the ornamental slats (to finish up the rattan):
- 8 wooden slats, sawed in miter: 39cm long
- 8 wooden slats, sawed in miter: 79cm long
Step 2.
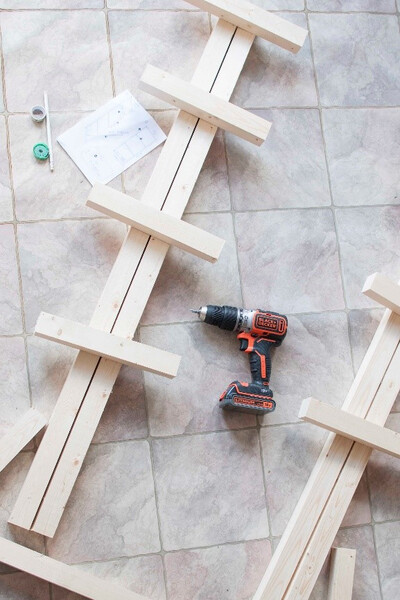
Cut the wood using the BLACK+DECKER® 18V POWERCONNECT™ Jigsaw to the correct dimensions mentioned above.
Take 2 beams (130cm long) for the corners and measure every 32.5cm. Mark with a pencil. Drill a hole, half the length of a dowel, where you’ve made a mark.
Tip: use tape to mark how deep you want to drill on the drill driver.

Step 3.
Place the beam, with the dowels on the floor, and place a board (30.6cm) straight against it.
Mark the top of the dowel with a pencil, where you can easily make an imprint on the small board. This way you know exactly where the drilling hole should be. Pre-drill the small boards and the bottom beam.
Tip: write a letter or number on every piece in pencil to easily put the closet together without needing to figure out which beam goes where.
Step 4.
Since the shelves won’t be fixed to the closet, 3 of the 4 wooden beams need a cut to fit neatly in the closet. Draw a cut of 5cm on every corner with a pencil. The shelves will fit perfectly between the large beams and on the side beams. With a Jigsaw you can easily saw out the squares. Sand it up for a finishing touch.
Now take the closet apart, time to stain. Stain all the wood: the beams, boards, shelves. Let it dry well.
Tip: Use an old shirt to stain. The effect is way more natural than with a brush. Since the closet will stand inside, a thick layer isn’t necessary. But of course you choose what you like most!


Step 5.
1. When everything is dry, we can put everything back together. Start with 1 corner beam (130cm) and place the side beams (30.6cm) together. Close it up by placing the second corner beam on the side slats.
2. Do the same thing for the other side. Place the complete construction against the wall. Connect both sides by attaching the horizontal bottom beam (70.6cm).
3. Place the shelves on the side beams (start with the bottom one) and place the top shelf (without cuts) on top of the closet. Attach these with long screws onto the wooden corner beams.
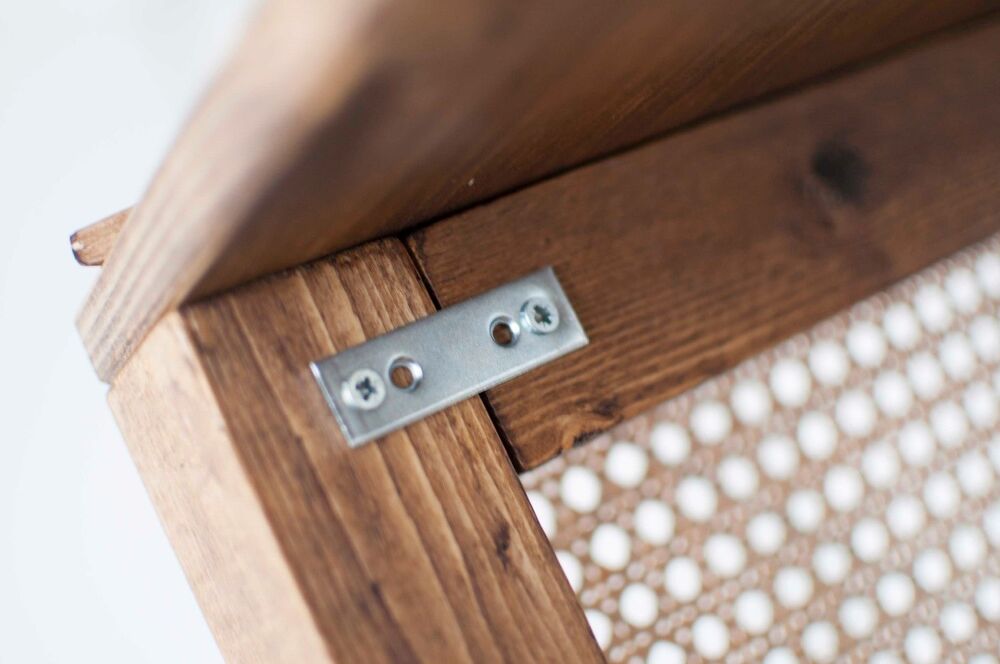
4. To make sure you have a steady construction, use connection plates and fix with screws. Together with the wooden dowels, you’ll have a solid closet.
5. Now you have a steady rack! To make a real closet out of it, you need the rattan webbing and 2 doors.


Step 6.
Prepare the rattan webbing:
For a closet this size we need 4m of rattan webbing (40cm wide). Let the roll webbing soak in lukewarm water for an hour. This way the rattan gets flexible and easier to manage. When the rattan dries up and gets flat again, it gives a nice result.


Step 7.
Start with the doors: place 2 wooden slats of 97.5cm parallel next to each other. Fill the lines up with 4 slats (33cm long) - this is the beginning of a door! With glue and nails, arrange and secure the whole as straight as possible.
1. Create 2 doors and attach the rattan to the frames with a nail gun. Attach the hinges to the doors with a drill driver. Draw the exact location of the doors on the closet. The doors need to fit perfectly, so take your time. Then attach the doors, with the other side of the hinges.
2. Continue on the side of the closet: with thumb tackers or nails attach the rattan onto the wood. Cut away any excess with a sharp knife or scissors. Then cut the roll on the exact right length, this way you don’t waste any of the rattan.
3. Let the rattan dry up before adding the ornamental slats. They need to be cut with mitre saw. Please take your time for this or otherwise the edges won’t fit perfectly. Attach the ornamental slats onto the rattan with Wood Glue. Let them dry for at least an hour, using clamps to secure.
4. Finally, you close up the back of the closet with a thin MDF-plate. Put this in place using nails. Your closet is finished!